When working with a custom HDA, one might find themselves wanting to add more functionality to the parameters, especially if you are handing off this asset to a team who arent interested in digging around, and just need easy access as quick as possible. This is an example of how to utilize the Scripts portion of an HDA.
In my example, I have built an empty HDA with 2 parameters, one file input and a button with an icon and no label.

We can right click on the node and click on 'Type Properties' and go the 'Scripts' tab. At the bottom left, we can click the 'Event Handler' dropdown and select 'Python Module,' this is the event handler that deals with actions on the HDA.
In the script box on the right, add a function like this: def OpenDir(kwargs):
If you've read the other pages, you will know that we can use kwargs to get all the extra information from the node.
so if we print(kwargs), we get this beautiful mess:
{'node': <hou.SopNode of type lukevan::Test_HDA::1.0 at /obj/geo1/Test_HDA>, 'parm':
 <hou.Parm openBtn in /obj/geo1/Test_HDA>, 'script_multiparm_index': '-1', 'script_v
alue0': '0', 'script_value': '0', 'parm_name': 'openBtn', 'script_multiparm_nesting'
: '0', 'script_parm': 'openBtn'}
If we fish through this, we can see a few bits of use, namely 'node'. So in our script, we can now use the node to get any parm on the node. From here, we have a basic hou.node case here, where the docs can guide us.
So now, our updated function looks like this:
def OpenDir(kwargs):
    node = kwargs['node']
    input = node.parm('file_input').eval()
Note the use of eval() here, otherise we are just getting a reference to the parm. We specifically want to get the value of it, that is why we use eval().
Our initial goal was to open the path in our native explorer, so let's add that last line into our function.
def OpenDir(kwargs):
    node = kwargs['node']
    input = node.parm('file_input').eval()
    hou.ui.showInFileBrowser(input)
The last step is to add a callback function to our buttom, to run the script when we press it.
We use the function hou.phm() which is a shorthand for hou.pwd().hdaModule(). So with that, we can set the callback function to:
hou.phm().OpenDir(kwargs)So now our button will open the location selected in the file input parameter.

Clicking Buttons
flag
When creating HDAs, you may find yourself needing to press the save button on an alembic ROP or something similar, and may also find that promoting it starts to cause a few concerns. One of the easiest ways to solve this is to write a small helper script in your Scripts tab in the HDA that handles pressing whatever buttons you need.
Create a new HDA with a node inside it that requires the button to be pressed. On your HDA, add a button paramater and give it a name and label, like "Save".
In the callback script for the button, write hou.phm().press_button(kwargs). We pass kwargs as an argument because the callback script runs with some useful info we can use in our script.
Then, in the scripts tab, we can write up a function that we will run:
def press_button(kwargs):
	n = kwargs.get("node") # this is the HDA

    # we need to get the path of the child node we want to press the button on
    to_press = hou.node(n.path() + "/rop_fbx1")
    button = to_press.parm("execute").pressButton()
Now, when we press our save button, it presses the save button on the child node. We use parm.pressButton() here to emulate clicking the button.
This now gives us the freedom to chain up multiple saves/caches if need be, as well add any other logic into the function.
You could even adjust this to pull the to_press node from a parameter on your HDA if need be.
How to create multiparm blocks, set and access them through the Python API/HOM.
To create a multiparm block, you actually need to grab the "Folder" parameter. Then, set the "Folder Type" to one of the 'Multiparm Block' types.
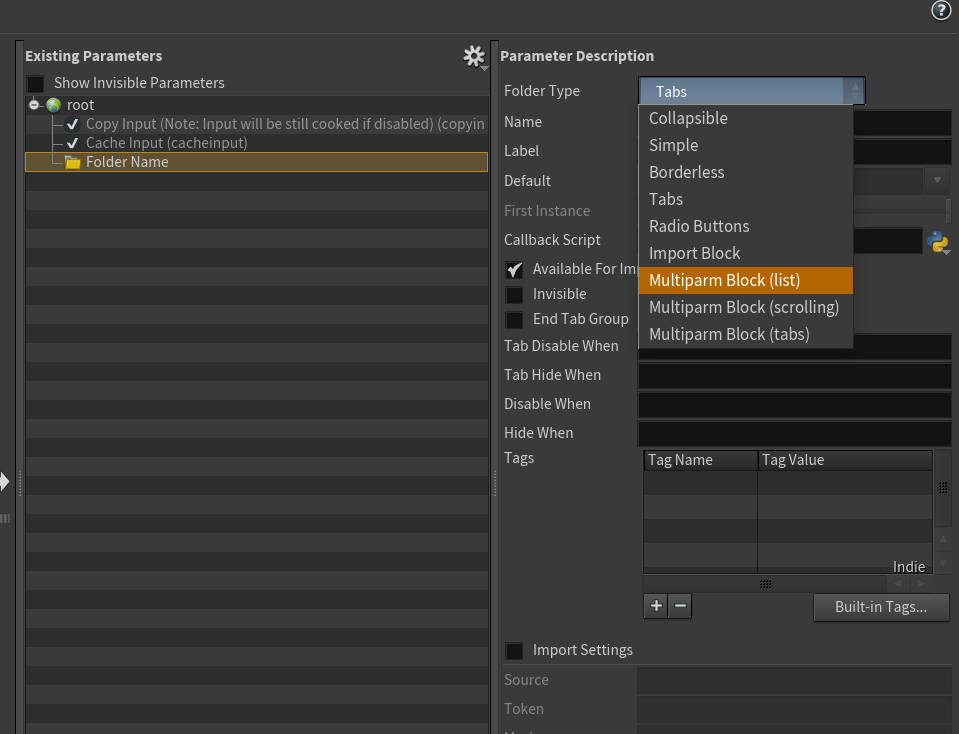
All 3 types are essentially the same, only the UI differs. I tend to use the 'List' type most often but that's personal preference.
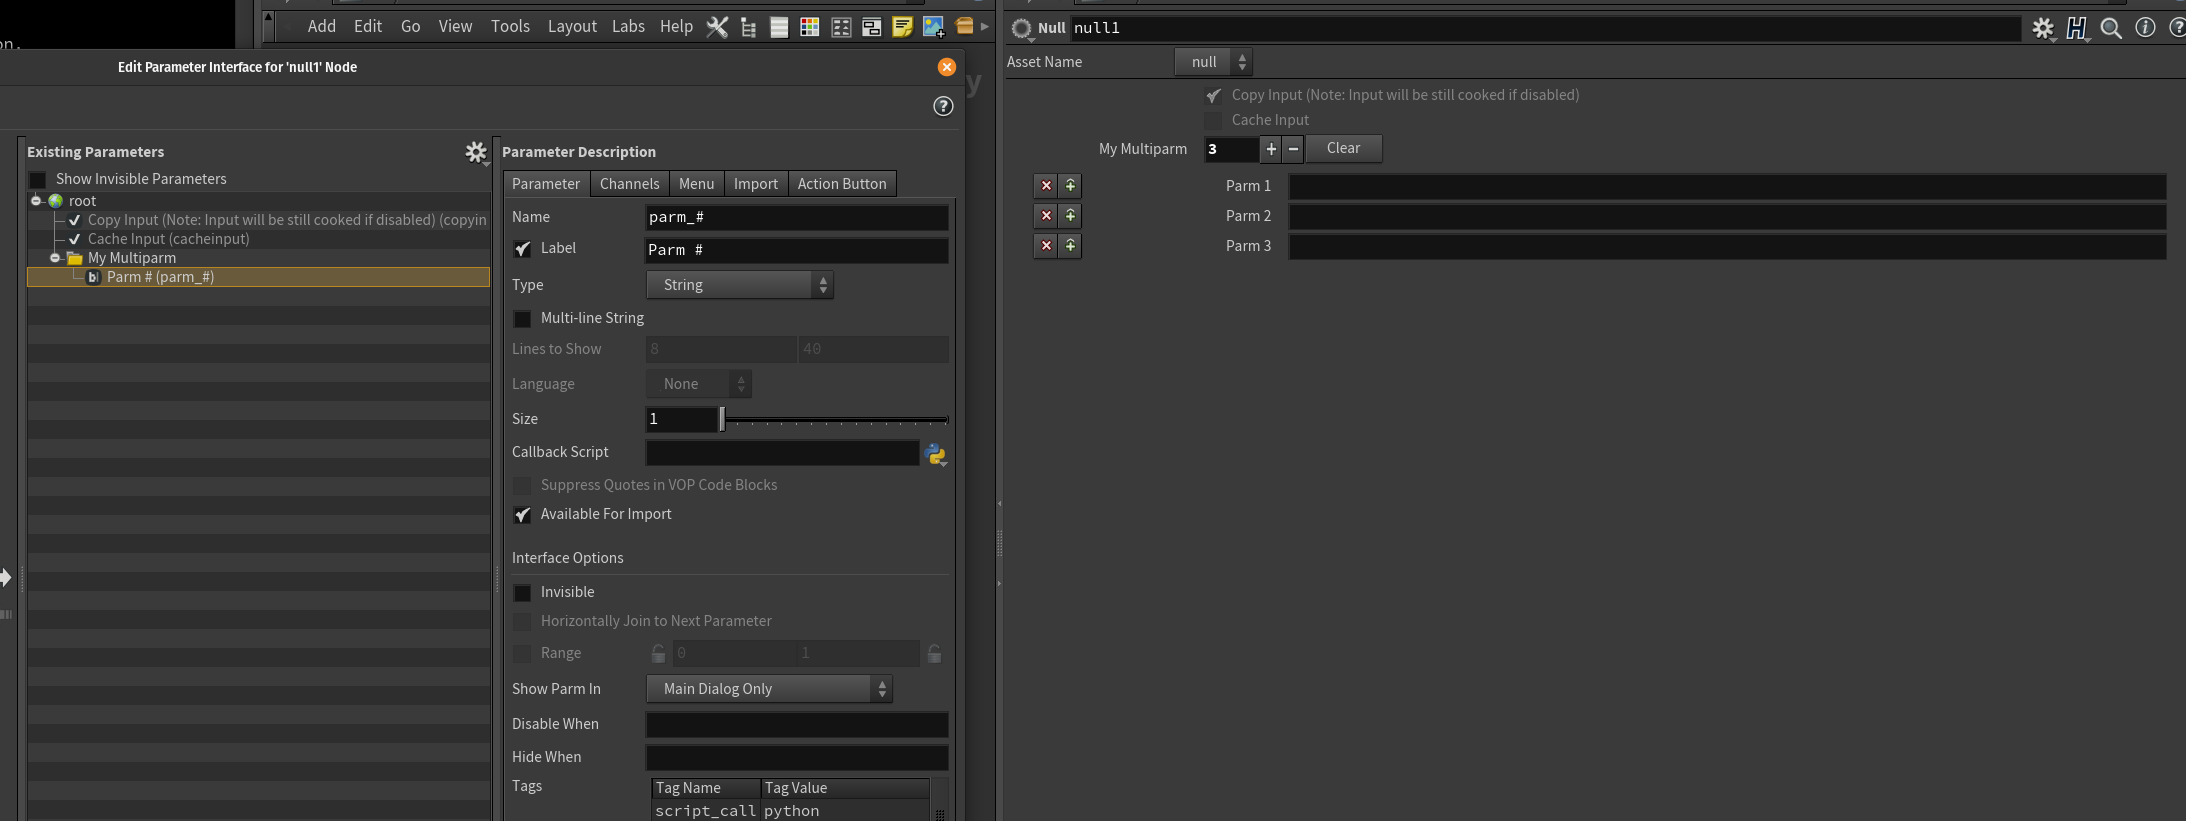
You can now create a parameter of your choosing inside the block. In this example, I created a string parameter. Each time you press the '+' button on the block, it will create an instance of your parameter(s). In my case, it creates a string parameter. Note the '#' character in my parm name parm_#. This refers to the instance of the parameter. If you look at at the image below, you can see my parms are labelled: Parm 1, Parm 2, Parm 3.
Creating a Multiparm block and setting its instances with Python
To create a parameter on a node, you need node.addSpareParmTuple() which requires a hou.ParmTemplate. Now that you know that a multiparm block is a folder, we can use the hou.FolderParmTemplate class to create our multiparm block.
We need to initialize our FolderParmTemplate to have the folder_type argument as one of the MultiparmBlock types. In this case we will use the hou.folderType.MultiparmBlock.
We will now create a parameter inside the multiparm.
First we create the parm template, choosing for this example the StringParmTemplate class.
We can now call addParmTemplate() on the multiparm template to add the StringParmTemplate to it.
Then we use addSpareParmTuple(template) on the target node to create the multiparm block.
Say you want to set a float parameter to 5.25; you would use the set() method on your parameter object, like so: node.parm('my_float_parm').set(5.25)
Multiparms work in a similar fashion. The set() method will accept an integer as an argument. For example:
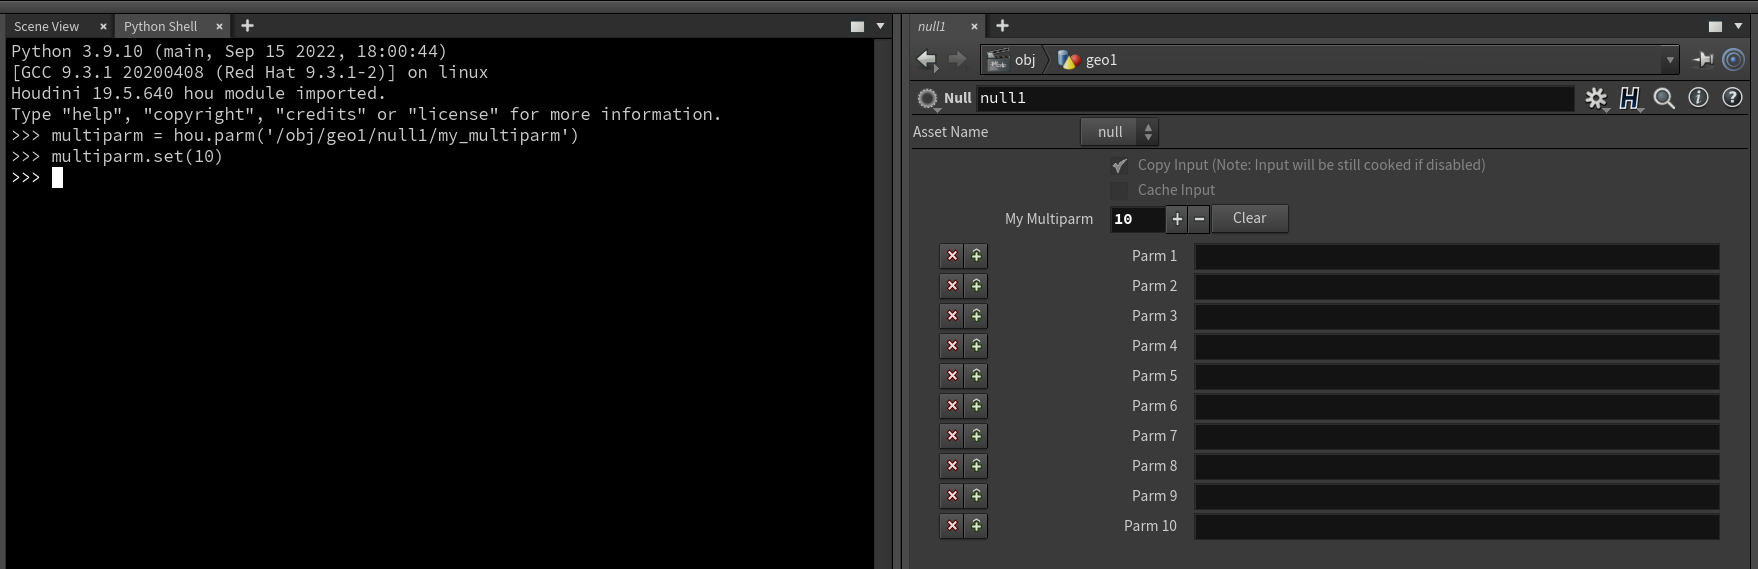
So, let's now call parm.set(15). This will create 15 instances of the string parameter we added to the block.
Great! You've set your multiparm to the desired number of instances. If you want to clear it, simply set it to 0: parm.set(0)
We've now created a multiparm block that holds a string parameter, and created 15 instances of said string parameter. Let's see what that snippet looks like:
node = hou.node('/obj/geo1/ME') #this is just a null inside of sops
template = hou.FolderParmTemplate("my_block","My Block",folder_type = hou.folderType.MultiparmBlock)
stemplate = hou.StringParmTemplate("my_instance_#","My Instance #",1)
template.addParmTemplate(stemplate)
parmtuple = node.addSpareParmTuple(template)
node.parm('my_block').set(15)
Accessing the multiparm instances
You can use a for loop range(multiparm.evalAsInt() to iterate through all items.
Here's the catch: when creating a multiparm, there's an option to decide how the instances are numbered, the "First Instance" option.
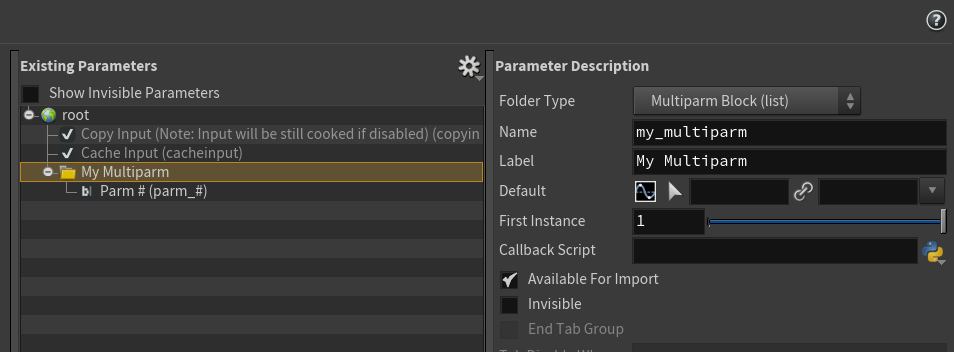
As you can see, our parms start at 1. That's because we have 'First Instance' set to 1. This means that when looping through the parms, we'll have to add 1 to the iterator.

To get the Parm object, we're using node.parm('parm_'+str(i+1)), that's because 'First Instance' is set to 1 but iterators in loops start at 0 (you probably already know this).
This is fine but it's something you have to keep in mind.
Don't want to have to deal with that? Set 'First Instance' to 0, then you won't have to add 1 to your iterator. However that will also influence the look of your UI : the first parm is now labelled 'Parm 0'.

Earlier we created a multiparm block with Python. What if you want to set 'First Instance' using Python too?
When creating the parm template, you can specify a 'tags' argument that will let you set that 'First Instance' to whatever your heart desires ( as long as it is an unsigned int, aka x >=0.). Well I say uint but you then have to convert it to a string. You'll most likely only ever set it to '0' or '1'.
Let's take our previous snippet and specify the 'multistartoffset' tag to set the 'First Instance' option through Python.
node = hou.node('/obj/geo1/ME') #this is just a null inside of sops
tags = dict()
tags['multistartoffset'] = '0' #note that 0 is a string
template = hou.FolderParmTemplate("my_block","My Block",folder_type = hou.folderType.MultiparmBlock,tags=tags)
stemplate = hou.StringParmTemplate("my_instance_#","My Instance #",1)
template.addParmTemplate(stemplate)
parmtuple = node.addSpareParmTuple(template)
node.parm('my_block').set(15)
Say you've rebuilt this setup, let's provide you with an example snippet that sets your multiparm block to 15 instances and sets each of them to some random gibberish.
In the snippet below, index == str(i). This works because we had set 'First Instance' to 0! Don't forget that by default 'First Instance' is equal to 1 which means you would have to set index to be str(i+1).
Here's what the code looks like:
import random
import string
import hou #depending on where you write this you might not need this import

def create_rand_string(length):
	characters = string.ascii_letters + string.digits + string.punctuation
	rstring = ''.join(random.choice(characters) for i in range(length))
	return rstring

node = hou.node('/obj/geo1/ME')
parm = node.parm('my_block')

instances = 15

parm.set(15)

for i in range(instances):

    index = str(i)

    parm = node.parm('my_instance_'+index)

    randint = random.randint(i+1,20)

    parm.set(create_rand_string(randint))
That's it! Set all the instances within a multiparm block using python.

When using nodes in Houdini you'll often come across these handy menus that usually come with string parameters.

Let's look at how we can DIY that.
Let's create a new string parameter and head to the menu tab of the parameter description.

We'll tick Use Menu and set it to Replace (Field + Selection Menu). You can experiment with other options but this is usually the one you want.
Now you can write your own menu by setting a token then a label. That's cool and all but this is Houdini, we'd like something procedural. Let's use the menu script tab to write some python instead !
The script is pretty much a callback that runs every time you click the button. The callback needs to return a list that's built exactly like a regular menu: (token1,value1,token2,value2,token3,value3)
In this example we'll get a list of directories. Let's say my hip is /home/what/projects/pythonstuff.hip. I want to get all the directories that live in /home/what/projects, my hip's parent directory.
Let's look at our code 
import os
from pathlib import Path

basedir = hou.expandString("$HIP")

parent = Path(basedir).parent

menuitems = list()

dirs = os.listdir(parent)

for dir in dirs:

    menuitems.append(dir)
    menuitems.append(dir)

return menuitems
We're getting the path to the HIP with hou.expandString('$HIP') . We could do the same with hou.getenv('HIP'). Then we're getting the parent directory with Path.parent. We could also use os.path.split()[-1]. Many ways to skin a cat ; this example focuses on how you can create the menu, not so much on which methods/packages you should use. We're then creating a empty list. os.listdir() gives us a list of the directories contained within parent. We then iterate through the list and add the item to the menu. Why twice ? A menu needs a token and a label. In this case, we want them to have the same value. Let's illustrate this by reworking the loop.
for index,dir in enumerate(dirs):

	menuitems.append(str(index))
	menuitems.append(dir)
In this example, the token would be : 0,1,2,... and the value would be each directory. So clicking on the menu item would return :0,1,2.

This might be something you want but most of the time you want the values to match.
If you want to check how more menus are implemented, the Labs or SideFx HDAs are a good place to start.
Encapsulate data in a HDA
Sometimes, we need to create data that is unique to a specific node and cannot be modified by other nodes of the same type. In the Python module, most data and variables are shared among every node of the same type.
import hou

# GLOBAL VAR EXAMPLE
previous_value = 0

def get_difference_from_global(current_value):
    global previous_value

    difference = current_value - previous_value
    print("DIFFERENCE: {}".format(difference))

    previous_value = current_value
In this example, we manipulate the previous_value variable using the global keyword. You might expect the global keyword affect only that node, but in reality, that information is the same for every instance of the node.

To avoid conflicts between node information, we need to encapsulate those pieces of information. For this, I'll demonstrate four different approaches to achieve this. All of them have some drawbacks, so the best choice often depends on the situation. For demonstration, I will use the same problem for all four approaches: calculating the difference between the previous and current value when a parameter is changed.
Hidden parameter
The most obvious solution is to use a hidden parameter and utilize it to store the value. There are many advantages to this approach: it's simple and fast to implement, it saves data between sessions, and this is the most "Houdini-like" approche. However, some data types don't have parameter types (such as lists, sets, and tuples). In such cases, you need to rely on type conversion. Additionally, over time as our HDA grows and we add more invisible parameters, it might become challenging to keep track of which parameters connect where and which ones get updated.
I've created two parameters: one that the user can interact with and another one that will serve as our hidden parameter.

# HIDDEN PARM EXAMPLE
def get_difference_from_invisible_parm(current_value):
    previous_value = hou.pwd().parm('prev_value').eval()

    difference = current_value - previous_value
    print("DIFFERENCE: {}".format(difference))

    hou.pwd().parm('prev_value').set(current_value)
UserData
By default, every node comes with two dictionaries: "userData" and "cachedUserData". If we take a closer look at the Houdini documentation, they even refer to these two dictionaries as the "Per-node user-defined data", making them the closest thing to the de facto encapsulation method. First, let's examine userData. It's a handy solution for storing string variables between sessions. Compared to parameters, userData can be created and accessed where we actually need it, reducing clutter in our parameter list. However, the problem is that it can only store strings, so we either heavily rely on type conversion or implement workarounds. In this case, I go with the last one and simply convert the UserData entry to an integer, which is then converted back to a string after we do the calculation.
I define an entry in the OnCreate module, so there's no chance it's not available when I call it:
node = kwargs['node']
node.setUserData('previous_value', '0')
And this is the PythonModule section:
# USER DATA EXAMPLE
def get_difference_from_user_data(current_value):
    previous_value_str = hou.pwd().userData('previous_value')
    previous_value = int(previous_value_str)

    difference = current_value - previous_value
    print("DIFFERENCE: {}".format(difference))

    hou.pwd().setUserData('previous_value', str(current_value))
CachedUserData
Compared to userData, cachedUserData can store any type of data, such as integers, lists, dictionaries, and even objects. However, the main disadvantage is that it only stores data for the current session.
Like previously I create the entry in the OnCreate module:
node = kwargs['node']
node.setCachedUserData('previous_value_cache', 0)
Python module:
# USER CACHE EXAMPLE
def get_difference_from_user_cache(current_value):
    previous_value = hou.pwd().cachedUserData('previous_value_cache')

    difference = current_value - previous_value
    print("DIFFERENCE: {}".format(difference))

    hou.pwd().setCachedUserData('previous_value_cache', current_value)
Singleton pattern
Basically, it's like cachedUserData, but it's overcomplicated. It can store any data type for the current session. One minor advantage is that it gives you full access to every value while still encapsulating them. Additionally, it's open to extension, unlike the UserData classes (so we can add new methods if needed, such as destroy_all or return_every_instance).
There are two main issues:
- Singleton is a controversial topic among Python developers because Python modules work exactly like a singleton. Here we use singleton because it's a more stable solution compared to HDA modules. (One issue I found out recently is that sometimes returning an object from another module actually gets converted to a string).
- The implementation is rather robust, and we need to handle instance removal as well, otherwise, we'll face with some nice "hou.ObjectWasDeleted" errors.
# SINGLETON
class PreviousValues:
    _instances = {}

    @classmethod
    def get_instance(cls, node_instance):
        if node_instance not in cls._instances:
            cls._instances[node_instance] = 0
        return cls._instances[node_instance]

    @classmethod
    def set_value(cls, node_instance, value):
        cls._instances[node_instance] = value

    @classmethod
    def delete_instance(cls, node_instance):
        cls._instances.pop(node_instance)


def get_difference_from_singleton(current_value):
    previous_value = PreviousValues.get_instance(hou.pwd())

    difference = current_value - previous_value
    print("DIFFERENCE: {}".format(difference))

    PreviousValues.set_value(hou.pwd(), current_value)
The OnDelete module handle the remove of the instance:
type = kwargs['type']
node = kwargs['node']

type.hdaModule().PreviousValues.delete_instance(node)
Python Module
flag
You can do a lot of scripting right in an HDA. If you create a new HDA, in the type properties you can can click to tab for "Scripts". On the bottom left, there is an "Event Handler" dropdown. You can select any of these and bind some python to those events. The most basic on is the "Python Module" one, that is basically just a little environment for functions and logic that you can call from other places in the script.
In the Python Module script, create a function like so:
def hello_world(**kwargs):
	print("Hello World")
Now you can use the script in the callback script of any parm. For example, make a button parm and on the callback script, set the language to Python and in the box, type hou.phm().hello_world()
Now when you click the button, you run the function.